Randomness of Life
Table Of Contents
In the previous article from this series, we’ve talked about genetic algorithms and how they can be used to generate art. Now let’s put those ideas into action and focus on implementing the first part of our artistic toolset: mutators.
Preparing the ecosystem
Before we begin working on mutators, we need to prepare an environment in which our specimens can thrive. We don’t need much - right now the only thing is a generation. For the record, in this context, a generation is a collection of specimen which can be mutated, scored, and bred (basically experimented upon) to get us closer to the optimum. Since our specimens are images, they can be represented by the following structs:
 1struct Pixel {
 2    r: u8,
 3    g: u8,
 4    b: u8,
 5}
 6
 7struct Image {
 8    height: usize,
 9    width: usize,
10    pixels: Vec<Pixel>,
11}
Representing each pixel as a 24-bit value gives us some flexibility here – it allows us to operate on two color depths: true color (which uses 24-bit colors) and grayscale (8-bit). Creating a grayscale pixel can be done by setting up all color channels to the same value. True, it uses thrice as much memory as it could, but…
Premature optimization is the root of all evil.
~ Donald Knuth
Method of initializing1 the generation will affect how fast we can search the solution space. As the algorithm produces more fitted images, the specimens get closed to the source image. But we don’t really care about how fast the optimum can be achieved, frankly, we don’t really care about achieving the optimum in the first place. It is the process of getting more fitted images and seeing how they evolve what’s really interesting. Therefore our generation will be initialized by blank images - images filled by white pixels. It will reduce pace of solution space search, but will produce images that are more visually interesting. We are here to do art, after all. 🎨
 1impl Pixel {
 2    #[must_use]
 3    pub const fn white() -> Self {
 4        Pixel::new(255, 255, 255)
 5    }
 6
 7    #[must_use]
 8    pub const fn new(r: u8, g: u8, b: u8) -> Self {
 9        Pixel { r, g, b }
10    }
11}
12
13impl Image {
14    #[must_use]
15    pub fn new(height: usize, width: usize, pixels: Vec<Pixel>) -> Self {
16        Self {
17            height,
18            width,
19            pixels,
20        }
21    }
22
23    #[must_use]
24    pub fn blank(height: usize, width: usize, pixel: &Pixel) -> Self {
25        let size = height * width;
26        let pixels = vec![pixel.clone(); size];
27
28        Self::new(height, width, pixels)
29    }
30}
31
32#[must_use]
33fn get_first_generation(
34    vec_len: usize,
35    image_height: usize,
36    image_width: usize
37) -> Vec<Image> {
38    let pixel = Pixel::white();
39    vec![Image::blank(height, width, &pixel); vec_len]
40}
This code takes care of initializing the generation. 👌
Throwing dice and hoping for the best
As was mentioned in the previous article, mutators act only on one specimen at a time, inserting random modification onto it. With that description alone, we can already define a contract for all mutators we’re going to implement:
Why &self and not &mut self? Due to the fact that mutations are independent of one another, they can be performed
concurrently. In fact, as we will see in the future articles, mutating and scoring are the only steps that can be
easily run in parallel.
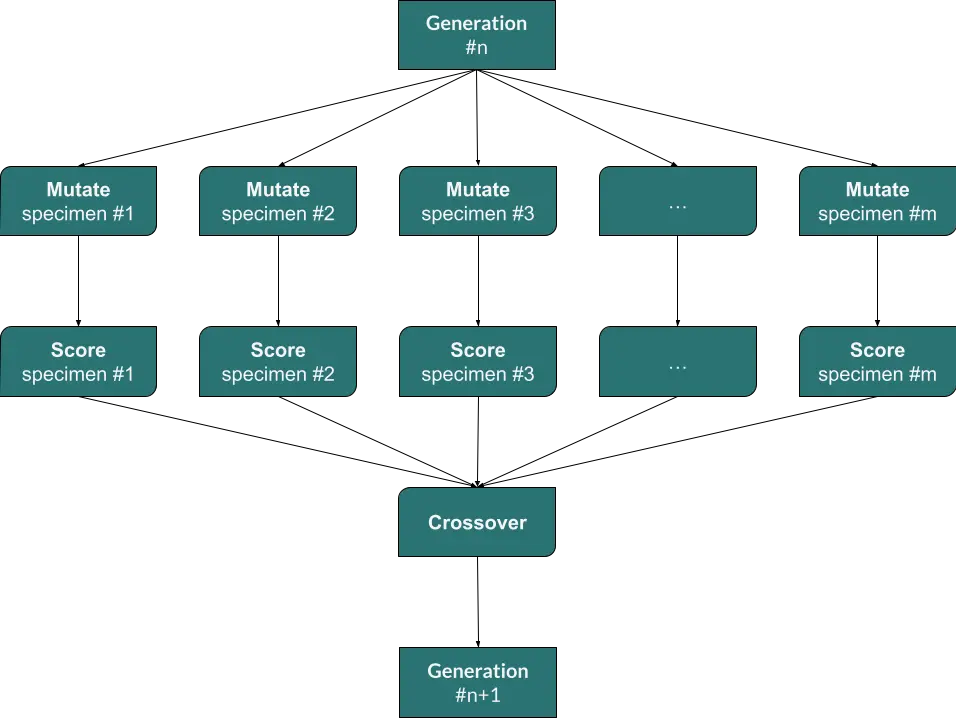
A diagram showing the flow of actions applied on a single generation.
Throwing a rectangular dice
Rectangles are the easiest shape to draw both algorithmically and IRL; our first mutator will use rectangles as a mutation primitive. To generate a random rectangle we need have the following:
- coordinates of one of its corners,
- width,
- height,
- fill color.
Fill color is pretty straightforward, but other values have some constraints they need to meet. An image we’ll be mutating has width and height – let’s assume it’s n and m respectively. Coordinates of one of the corners, in our case it’s going to be top-left, are limited by the image dimensions. Width and height are limited by both image dimensions, and the coordinates we just generated.
$$ x \in \lbrack 0 .. n \lbrack \newline y \in \lbrack 0 .. m \lbrack \newline width \in \lbrack 1 .. n - x + 1 \lbrack \newline height \in \lbrack 1 .. m - y + 1 \lbrack \newline $$
Why coordinates intervals are right-open? Because if the mutator selects the very right or bottom edge, then the rectangle would need to have zero width/height. By not right-closing the intervals, we ensure that there’s at least one pixel which can be mutated 👌. Similarly both width and height intervals are right-open to ensure that the rectangle will not overflow the image.
 1struct RandomRectangle {
 2    x: usize,
 3    y: usize,
 4    width: usize,
 5    height: usize,
 6}
 7
 8#[must_use]
 9fn get_random_rectangle(random: &mut Random, image: &Image) -> RandomRectangle {
10    let image_width = image.width();
11    let image_height = image.height();
12
13    let x = random.get_random(0usize, image_width);
14    let y = random.get_random(0usize, image_height);
15
16    let width = random.get_random(0usize, image_width - x) + 1;
17    let height = random.get_random(0usize, image_height - y) + 1;
18
19    RandomRectangle {
20        x,
21        y,
22        width,
23        height,
24    }
25}
Function get_random_rectangle is a neat helper: based on the given RNG2 and
image, it returns a struct representing a random rectangle within the boundaries of the image.
Only two things left to do: generate random color and draw the shape. The implementation of rectangle mutator will look like this:
 1#[derive(Debug, Default)]
 2pub struct RectangleMutator;
 3
 4impl Mutator for RectangleMutator {
 5    fn mutate(&self, image: &mut Image) {
 6        let mut random = Random::default();
 7        let rect = get_random_rectangle(&mut random, image);
 8
 9        let r = random.get_random(0u8, 255);
10        let g = random.get_random(0u8, 255);
11        let b = random.get_random(0u8, 255);
12
13        let image_width = image.width();
14
15        for j in rect.y..(rect.height + rect.y) {
16            for i in rect.x..(rect.width + rect.x) {
17                let pixel = &mut image[j * image_width + i];
18                pixel.r(r);
19                pixel.g(g);
20                pixel.b(b);
21            }
22        }
23    }
24}
The implementation is really simple. First we get a random rectangle (using the helper function), then generate color
channels, and finally draw the shape. Drawing itself is done by two nested loops iterating over columns and rows of the
image. With the two indexes it references a specific pixel: j * image_width + 1 and finally overrides it using the
color channels.
Cool, let’s see what the program generates after 10 000 generations when initialized with “Mona Lisa”.
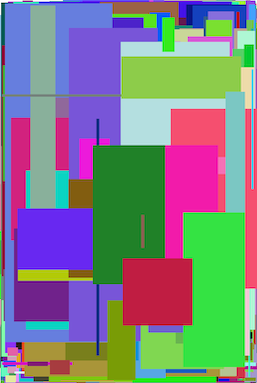
Mona Lisa (generation #10 000)
Doesn’t really looks like anything. 😐
Which isn’t very surprising; the code did what it was suppose to do: it generated random rectangles on the white image.
Since we don’t have any scoring logic yet (that’s a topic for another article) the resulting image is composed of random
noise. We’ll need to wait a bit longer to get an image that even remotely reflects “Mona Lisa”.
Throwing dice of other shapes
It’d be nice to have mutators other than RectangleMutator, which are able to mutate images with different shapes, but
I’m not going to cover them here. The reason is simple – they operate under the same rules: you need to define
boundaries first and then you need to draw the desired shape. I’ve implemented two other mutators: TriangleMutator and
CircleMutator. Their sources can be found on
github.com/nathiss/franklin.
Afterword
You might’ve noticed that the code examples of this article are not strictly bounded together, meaning you cannot just
copy them to have a working example. A bunch of things like: Random implementation, loading the original image,
mutation loop, and the whole impl Image block are missing. If you want to have a working solution it’s
github.com/nathiss/franklin
(locked down to the newest commit at the moment of writing – 73aa8da). The goal of this series is not to go through
every single line of code to build a working utility, but rather to present an idea. So, moving forward all future
articles from this series will also be done in that style.
Photo by Alexander Grey on Unsplash
Stay tuned 🌊
Usually the generation is generated randomly. See Genetic_algorithm. ↩︎
Randomis a project-private utility class. Source can be found github.com/nathiss/franklin. ↩︎
Interested in my work?
Consider subscribing to the RSS Feed or joining my mailing list: madebyme-notifications on Google Groups .
Disclaimer: Only group owner (i.e. me) can view e-mail addresses of group members. I will not share your e-mail with any third-parties — it will be used exclusively to notify you about new blog posts.